
Abstract
Adult-stem-cell-derived organoids model human epithelial tissues ex vivo, which enables the study of host–microbe interactions with great experimental control. This protocol comprises methods to coculture organoids with microbes, particularly focusing on human small intestinal and colon organoids exposed to individual bacterial species. Microinjection into the lumen and periphery of 3D organoids is discussed, as well as exposure of organoids to microbes in a 2D layer. We provide detailed protocols for characterizing the coculture with regard to bacterial and organoid cell viability and growth kinetics. Spatial relationships can be studied by fluorescence live microscopy, as well as scanning electron microscopy. Finally, we discuss considerations for assessing the impact of bacteria on gene expression and mutations through RNA and DNA sequencing. This protocol requires equipment for standard mammalian tissue culture, or bacterial or viral culture, as well as a microinjection device.
Introduction
Since they were first reported in 2009 (ref. 1), adult-stem-cell-derived organoids have vastly expanded the possibilities to grow healthy epithelial cell types. In recent years, these near-physiological models have led to substantial advances in stem cell biology, disease modeling and the study of host–microbe interactions. Amongst others2,3,4, adult-stem-cell-derived organoids have been harnessed to study Cryptosporidium parvum5, Helicobacter pylori6, norovirus7, severe acute respiratory syndrome coronavirus 2 (refs. 8,9) and genotoxic Escherichia coli10 infections.
The important role of the intestinal microbiota in healthy organ function and diseased states is increasingly recognized. Nevertheless, many links of microbes to diseases remain correlative owing to the difficulty of modeling host–microbe relationships in a reductionist yet meaningful way. This underlines the importance of sophisticated in vitro model systems to gain mechanistic insights into microbial effects on the epithelium and enable the development of therapeutics targeted at microbial–epithelial interaction processes. In this protocol, we lay out a broadly applicable procedure for the injection of microbes into the organoid lumen, as employed in recent studies5,10. Furthermore, we present protocols for 3D and 2D apical and basal exposure to microbes for medium-throughput studies and for pathogens with a nonapical infection route. While these protocols mostly entail bacterial cocultures, dedicated protocols for viral11 and parasitic12,13 organoid exposure have recently been published and can be directly coupled to the methods described here.
Development of the protocol
The protocols for microbe–epithelium cocultures presented here are based on human adult-stem-cell-derived organoids, which have been described previously14. The polarization of human small intestinal and colonic organoids results in a cystic shape with the inside corresponding to the gut lumen. This necessitates microinjection of gut microbiota into the lumen of organoids for a faithful representation of epithelium–microbe orientation. Based on the development of microinjection procedures for various organoid systems and pathogens in our group, we here provide a comprehensive protocol for the preparation and microbe coculture of human intestinal organoids (Fig. 1). We also describe deviations from this coculture protocol that can be performed without the need for microinjections, such as viral exposure8,15 or 2D cocultures in Transwell plates (Box 1).
Applications
The protocols outlined below have broad applications in the study of microbe–epithelium interactions in cancer, infectious diseases and homeostasis. They are suitable for the investigation of single microbial species effects but could also be amended for combinations of different microorganisms. The use of adult-stem-cell-derived organoids makes the protocols ideally suited for applications where faithful recapitulation of wild-type epithelial cell types is of importance and where other microenvironmental influences need to be excluded. In particular, target cells for viral or bacterial infection can be characterized in great detail and with tight experimental control.
Limitations
There are limitations that need to be addressed in the future regarding the coculture of organoids with microbes. Particularly, the manual nature of the microinjection procedure makes it difficult to scale it up to higher-throughput experimental setups. Additionally, this protocol describes a reductionist approach to organoid–microbe coculture, using single microbial species. This strategy does not take into account the whole complexity of the intestinal microbiota ecosystem, such as complex interactions with the immune compartment. Furthermore, this system does not fully recapitulate other aspects of the intestinal tract such as the crypt–villus structure, a fully mature mucus layer or the incorporation of flow. Finally, the manipulation of important factors such as oxygen and nutrient levels during the coculture process is still in its infancy. Therefore, some aspects might be modeled in a more reliable way using alternative systems that are briefly discussed below.
Comparison with alternative host–microbe interaction model systems
Adult-stem-cell-derived organoids provide a faithful representation of fully differentiated and progenitor epithelial cell types, making them ideally suited for studies on direct microbe–epithelium interactions16,17. The organoid lumen, which mimics the microbiota’s habitat, can be exposed to the microbe of interest via microinjection. The cystic nature of organoids allows bacterial species with low oxygen tolerance to survive and prevents bacterial overgrowth. Furthermore, organoid cocultures offer experimental control over the timeframe of exposure and the types of host cells that are involved. This can be tuned through differentiation in tailored organoid media18, yielding a faithful representation of the cell types required to answer the research question at hand. This reductionist, highly controlled approach allows detailed studies and exclusion of confounding factors, but it comes at the cost of reduced complexity of the model system. While the inclusion of further cell types from the stromal and immune compartment into organoid models is rapidly progressing19,20,21,22, no in vitro model represents the entire microenvironment faithfully to date.
Mouse models remain more suited to capture the full complexity of host–microbiota interactions, allowing simultaneous assessment of immune cell interactions and systemic effects of changes of the gut microflora, for instance23. They furthermore enable long-term experiments and the simultaneous study of different gut regions. Nevertheless, the complexity of the intestinal microenvironment and challenges with assessing parameters in real time complicates the derivation of direct causation. Crucially, human-specific microbe interactions cannot be modeled with mouse models.
Pluripotent-stem-cell-based organoids allow easy addition of stromal cell types to the organoids using dedicated differentiation protocols and therefore enable the investigation of more complex relationships24,25. Consequently, pluripotent-stem-cell-derived organoids have enabled pioneering work on bacterial and viral infections of intestinal cells26,27,28. However, handling of these organoids is more time-consuming and may prove restrictive for studies involving repeated genetic manipulation of organoids and clonal outgrowth after exposure to a pathogen.
Intestines-on-chip approaches have seen remarkable progress in the past years and have started to enable long-term cocultures with single microbial species29 or even complex communities30. We anticipate that intestines-on-chip will facilitate many host–microbe studies in the future with regard to scalability, experimental control and easy readouts such as barrier integrity of the epithelium. At this moment, many models still rely on seeding of immortalized cell lines31; culturing primary or organoid-derived cells on chip devices is in its infancy30,32. Therefore, proper representation of mature cell types remains a challenge, and detailed chip-based studies on host–microbe interactions are still scarce.
Experimental design
When setting up an organoid coculture, both the microbes’ and epithelial cells’ growth requirements demand close attention. Optimal medium compositions are likely to differ; hence, a dedicated medium recipe has to be found that addresses the needs of both. This is a vital step to ensure that the essential prerequisites to address the research question (such as viability and metabolic activity) are maintained. For viruses, these considerations are less pressing, as they can generally be cocultured using standard organoid media.
Another key consideration is the architecture of the coculture. Injections into the lumen of organoids have major advantages such as the physiologically relevant localization of bacteria and 3D recapitulation of the organ. Nevertheless, cocultures can also be set up using sheared organoids (Steps 77–87) and monolayers grown on Transwells (Box 1, Steps 1–11). A main advantage of these alternative protocols is the enhanced scalability and more homogeneous exposure of individual cells to microbes. A main drawback is the lack of a spatially and environmentally protected bacterial compartment, resulting in poor survival of obligate anaerobes or uncontrolled growth of other bacterial species. Furthermore, monolayer cultures lose the original 3D structure of the organ, and basal exposure to bacteria can be hampered by sedimentation of microorganisms. Exposure of sheared organoids also precludes any control over apical or basal exposure, which can be important in the case of luminal bacteria, for instance. For these reasons, the protocols below focus on microinjections into the lumen of cystic organoids unless stated otherwise.

First row: timeline of medium modifications for a typical bacterial coculture. Second row: preparation of bacteria and organoids. Third row: calculation of the MOI for organoid injections. Fourth row: organoid microinjections. Fifth row: assays for characterizing the coculture success.
A key consideration for organoid–microbe cocultures is synchronization of both components in the right growth state. Organoids should be grown as cysts of >200 µm in diameter for ideal injection success rate. Furthermore, organoids should be seeded sparsely before injection to ensure that the majority of organoids can be injected (Fig. 2g). For these reasons, organoids should be grown until spanning >200 µm in average diameter before being passed gently to avoid excessive shearing of organoids and seeded sparsely into a new plate (see Steps 1–3). Within 7 d after passage, organoids should regain their cystic shape and be ready for injection. Depending on bacterial growth speed, they should be inoculated 6–48 h before the planned injection to reach the optimal growth phase and numbers for coculture. This timing has to be optimized for each organoid line and microbe species to ensure synchronization and coculture success.

a, Double-sided tape holder for storage of injection needles. b, Bending of an injection needle. c, Transfer of bacteria suspension to an injection needle. d, Cutting of a needle under an appropriate angle. e, Representative image of a cut needle. f, Process of injecting an organoid with FastGreen dye. g, Overview images of a dome with injected organoids (scale bars, 2.5 mm and 0.5 mm, respectively). h, Bacteria clouds in injected organoids (scale bars, 2.5 mm and 0.5 mm, respectively). i, Organoids too small for injection (scale bar, 0.5 mm). j, Organoids too differentiated for injection (scale bar, 2 mm). k, Organoids too dense for efficient injection (scale bar, 2 mm). l, Bacterial overgrowth with marked organoid damage (scale bar, 2.5 mm).
In the case of studies on microbe interactions with terminally differentiated cell types, the timing of differentiation has to be optimized. Intestinal cells typically reach a mature state 5 d after induction of differentiation through a tailored culture medium or genetic induction17. Organoids become harder to inject in the process of differentiation, primarily due to a decrease in lumen size and increased thickness of the epithelial layer (Fig. 2j). In our experience, injecting within the first 2 d after differentiation induction enables the best coculture results unless terminally differentiated cells are required from the beginning of the exposure.
Since the size of organoids to be injected is heterogeneous, the number of injection shots per organoid should be adjusted depending on organoid size to keep the multiplicity of infection (MOI) similar between organoids. Calculating with five injection shots for an average-sized organoid is most practical to limit the number of injection shots while maintaining enough flexibility to adjust for smaller and larger organoids by changing the number of shots per organoid depending on size.
It is important to consider the intended readout of the coculture experiment. The protocols described here have proven useful in a variety of assays, ranging from modeling pathogen life cycles5 and immediate epithelial responses8 to long-term carcinogenic effects of bacterial exposure10. Studies on immediate effects of microbial exposure require consideration of the number of organoids that are necessary for each assay. Depending on this, the timing and numbers of injection can be carefully planned to allow controlled experiments without unnecessary delays. For long-term studies, the choice of a rapidly and cystically growing organoid line is advisable to enable repeated injections at high efficiency. Ideally, several organoid lines from independent donors with comparable growth characteristics should be used. In contrast to short-term experiments, the number of injected organoids becomes less important if the exposure is followed by a clonal expansion step to assess genomic effects in individual cells (Steps 65–76).
During cDNA synthesis for qPCR or library preparation, epithelial and bacterial RNA has different requirements. If epithelial RNA enrichment is required, use polyA primers. If synthesizing bacterial cDNA alone or together with epithelial cDNA, use random hexamer primers.
RNA derived from organoid–bacteria cocultures is amenable to several techniques that allow for the simultaneous analysis of both interacting partners’ transcripts33,34,35. For all of these approaches, a high proportion of harvested organoids should be injected to allow faithful detection of expression changes.
Materials
Reagents
-
Dulbecco’s Modified Eagle Medium (DMEM; Thermo Scientific, cat. no. 11965-092)
-
Advanced DMEM/F12 (Thermo Scientific, cat. no. 12634-010)
-
B-27 Supplement (Thermo Scientific, cat. no. 17504044)
-
GlutaMAX (Thermo Scientific, cat. no. 35050061)
-
HEPES (Thermo Scientific, cat. no. 15630080)
-
Penicillin–streptomycin (Thermo Scientific, cat. no. 15140122)
-
Primocin (Invivogen, cat. no. ant-pm-2)
-
Gentamicin (Sigma-Aldrich, cat. no. G1397)
-
Vancomycin (Sigma-Aldrich, cat. no. SBR00001)
-
N-acetyl-l-cysteine (Sigma-Aldrich, cat. no. A9165)
-
Nicotinamide (Sigma-Aldrich, cat. no. N0636)
-
Wnt surrogate (U-Protein Express, cat. no. N001)
-
Noggin conditioned medium (U-Protein Express, custom order)
-
R-spondin conditioned medium (U-Protein Express, custom order)
-
Human epidermal growth factor (Peprotech, cat. no. AF-100-15)
-
A83-01 (Tocris, cat. no. 2939)
-
SB202190 (Sigma Aldrich, cat. no. S7076)
-
Prostaglandin E2 (Tocris, cat. no. 2296)
-
Glutaraldehyde solution (Sigma-Aldrich, cat. no. G5882)
-
PBS (Thermo Scientific, cat. no. AM9624AM9624)
-
FBS (Thermo Scientific, cat. no. 16140-071)
-
Basement membrane extract (BME), growth factor reduced, type 2 (R&D Systems/Bio-Techne, cat. no. 3533-001-02)
-
Cell Recovery Solution (Corning, cat. no. Z317047)
-
DAPI (Thermo Scientific, cat. no. D1306)
-
TRIzol (Thermo Scientific, cat. no. 15596026)
-
RNeasy Mini Kit (Qiagen, cat. no. 74104)
-
CD326 (EpCAM) monoclonal antibody (MH99) (Alexa Fluor 488, eBioscience/Thermo Scientific, cat. no. 53-8326-42)
-
Fast Green FCF (Sigma-Aldrich, cat. no. F7252)
-
Brain heart infusion broth (Merck, cat. no. 53286)
-
eBioscience Cell Proliferation Dye eFluor 450 (Thermo Scientific, cat. no. 65-0842-85)
-
5(6)-CFDA, SE; CFSE (5-(and-6)-carboxyfluorescein diacetate, succinimidyl ester), mixed isomers (Thermo Scientific, cat. no. C1157)
-
CellTracker Orange CMTMR Dye (Thermo Scientific, cat. no. C2927)
-
CellTracker Red CMTPX Dye (Thermo Scientific, cat. no. C34552)
-
Y-27632 Rho kinase inhibitor (RhoKi; Abmole, cat. no. Y-27632)
-
TryplE (Thermo Fisher Scientific, cat. no. 12605010)
-
SB 202190 (Sigma-Aldrich, cat. no. S7076)
Equipment
-
Falcon tubes, 15 mL (Corning, cat. no. CLS430053)
-
5 mL polystyrene round-bottom tube with cell-strainer caps (Corning, cat. no. 352235)
-
Microcentrifuge tubes, 1.5 mL (Eppendorf, cat. no. 0030 120.0860030 120.086)
-
Plates, six-well (Greiner Bio-One, cat. no. 657 160)
-
Plates, 12-well (Greiner Bio-One, cat. no. 665 180)
-
Plates, 24-well (Greiner Bio-One, cat. no. 662 160)
-
Plates, 48-well (Greiner Bio-One, cat. no. 677 180)
-
Cell culture dishes, 100 × 20 mm (Greiner Bio-One, cat. no. 664 160)
-
Glass pasteur pipettes (VWR, cat. no. 612-1701)
-
EVOS Cell Imaging System (Thermo Fisher, cat. no. M5000)
-
Overhead microscope in ML-2 biosafety cabinet (Leica, cat. no. MZ75)
-
Centrifuge (Eppendorf, cat. no. 5810R)
-
Centrifuge (Eppendorf, cat. no. 5424)
-
24-well plate Transwell inset (Corning HTS Transwell-24 well permeable; 0.4 μm pore polycarbonate membrane; cat. no. CLS3396)
-
Eppendorf Microloader (Sigma-Aldrich, cat. no. EP5242956003)
-
Corning BioCoat poly-l-lysine, 12 mm (Corning, cat. no. 354085)
-
Hexamethyldisilazane (Sigma, cat. no. 440191)
-
Scanning electron microscopy (SEM) pin stubs, 12.5 mm (Agar Scientific, cat. no. AGG301-S-50)
-
Q150R sputter coater (Quorum Technologies, cat. no. Q150R)
-
Phenom PRO table-top scanning electron microscope (Phenom-World)
-
FemtoJet 4i microinjector (Eppendorf, cat. no. 5252 000.013)
-
Thin-wall glass capillaries (World Precision Instruments, cat. no. TW100F-4)
-
Needle puller model P-80/PC (Sutter Instrument Company)
-
Microsurgery scissors (Mcpherson-Vannas Iris, cat. no. ASSI.413126)
-
Ultrospec 10 Cell Density Meter (Biochrom; cat. no. 80-2116-30)
-
BACTRON300 Anaerobic Chamber (Sheldon Manufacturing)
-
New Brunswick Innova 44 bacterial shaker (Eppendorf, cat. no. M1282-0010)
Reagent setup
Organoid expansion medium
Organoid injections are performed in a medium that supports viability of both epithelium and a variety of bacterial strains.To make this expansion medium, supplement AdDMEM/F12 with B-27 Supplement (1×), Glutamax (1×), HEPES (1×), 1.25 mM N-acetylcysteine and 10 mM nicotinamide. The following growth factors should be added: 2% Noggin conditioned medium, 20% RSpondin I conditioned medium, 50 ng/mL epidermal growth factor, 0.5 mM A83-01, 1 µM PGE2, 10 μM SB202190 and 0.5 nM Wnt surrogate.
Some bacteria may be inhibited by N-acetylcysteine. For cocultures with these, the compound may be left out for the coculture period (make sure to also withdraw it in a control well for comparisons).
The organoid medium should be used within 1 month after preparation and stored at 4 °C. It can be stored frozen or as a liquid and used within the same timeframe after thawing. Avoid freeze–thaw cycles.
Antibiotics additions
To avoid contaminations in monoculture of organoids, add either 100 U/mL penicillin–streptomycin (stable at 4 °C for 2 weeks) or 100 mg/mL primocin (stable at 4 °C for 3 months) to the expansion medium and store at 4 °C.
After injection in antibiotics-free medium, the medium may be replaced with expansion medium containing 5 µg/mL of the nonpermeant antibiotic gentamicin (stable at 4 °C for 1 month) or 500 ng/mL vancomycin (stable at 4 °C for 1 week), when working with Gram-positive bacteria. This will prevent growth of bacteria outside of the organoid lumen, while also preserving viability of bacteria inside the organoids.
To terminate a coculture without splitting the organoids, 100 mg/mL of the antibiotics mix primocin is added to the culture.
Needle preparation
Pull glass cuvettes using a glass needle puller (we routinely use a P-80/PC (Sutter) needle puller at the following settings: Heat 645; Pull 100; Vel 200, Time 40). Pulled needles can be stored on a strip of tape in a Petri dish (Fig. 2a) and should be exposed to 10 min of UV irradiation in a tissue culture cabinet before their first use to minimize contamination. Pulled needles can be stored in the Petri dish inside a biosafety cabinet for more than a year. For injections into wells of 24-, 48- and 96-well plates, needles should be bent by flaming their center part with a Bunsen burner until an angle of ~45° is reached (Fig. 2b).
Chemical labeling of bacteria
Staining bacteria with fluorescent dyes before injection allows their behavior in coculture to be traced for up to 1 week. The following dye mixes (presented in the table below) can be used for labeling a variety of bacterial species (we have validated their use for strains of Fusobacterium nucleatum, Escherichia coli, Akkermansia muciniphila, Bacteroides fragilis, Bacteroides thetaiotaomicron, Bifidobacterium brevis, Bifidobacterium longum, Clostridium scindens and Lactobacillus reuteri).
Fluorescent dyes for labeling bacteria
Color | Dye | Final concentration | Excitation | Emission |
|---|---|---|---|---|
Blue | eBioscience Cell Proliferation Dye eFluor 450 | 20 µM | 405 | 450 |
Green | 5(6)-CFDA, SE; CFSE (5-(and-6)-carboxyfluorescein diacetate, succinimidyl ester), mixed isomers | 20 µM | 492 | 517 |
Orange | CellTracker Orange CMTMR Dye | 20 µM | 541 | 565 |
Red | CellTracker Red CMTPX Dye | 20 µM | 577 | 602 |
Procedure
Organoid preparation for microinjection
Timing 3 h hands-on time, ~1 week in total
-
1
~10 d before injection: starting from one densely plated well of a 24-well plate (~300,000 cells or 150 organoids with a diameter of ~300 µm), shear organoids mechanically as described before17. Ensure homogeneous size distribution using extensive passage through a narrowed glass pipette. Seed organoids sparsely (~30 organoid fragments per dome of ~20 μL) with one dome per well of a 24-well plate. Alternatively to 3D coculture, organoids can be seeded in Transwells for exposure of monolayers (Box 1).
Critical step
The seeding density is dependent on the downstream application. As a rule of thumb, a seeding density approximately tenfold lower than for standard organoid culture is advantageous to ensure that most organoids can be injected. A good density is shown in Fig. 2g, whereas a common organoid seeding that is too dense for efficient injections is depicted in Fig. 2k.
-
2
Let organoids grow until they have reached an average diameter of >200 μm (normally within 5–10 d after mechanical shearing). If the organoids are seeded too densely, they can be carefully reseeded in a new plate using a cut P1000 tip in a higher dilution ~3 d before the planned injection.
-
3
Three days before injection: change the medium to antibiotics-free medium to allow enough time for the antibiotics to diffuse from the BME domes. One day before injection, refresh the medium once more with antibiotic-free medium.
Bacteria preparation
Timing 1.5 h hands-on time, 1–2 d in total
-
4
Inoculate bacteria from cryostock into their optimal culture medium, and incubate overnight at 37 °C and 180 rpm.
-
5
Resuspend grown bacteria 1:10 in fresh optimal culture medium, and incubate until they have reached exponential growth phase and sufficient quantity for injection (an OD of ~0.4–0.6 in 1 mL medium is sufficient for most bacterial strains).
Critical step
For obligate anaerobic bacteria, an anaerobic chamber or comparable equipment should be used to grow the bacteria. Make sure to use anoxic media and maintain an anoxic environment for all steps until injection.
-
6
Spin bacteria for 10 min at 3,000g, and discard supernatant.
-
7
Wash with 10 mL of DMEM, and repeat Step 5.
-
8
Optional steps: if identification of the bacteria in a coculture by fluorescence microscopy (Steps 43–45) is desired, perform chemical labeling of bacteria by the following instructions (Fig. 3a,b):
-
Wash bacteria pellet twice with 10 mL of PBS to remove protein remainder
Critical step
Improper washing will prevent the dye from entering the cells in the next step.
-
Incubate for 45 min with 20 µM freshly prepared fluorescent dye (see table in ‘Reagent setup’ for suitable dye options)
-
Wash once with 10 mL of PBS
Fig. 3: Visualizing organoid cocultures. 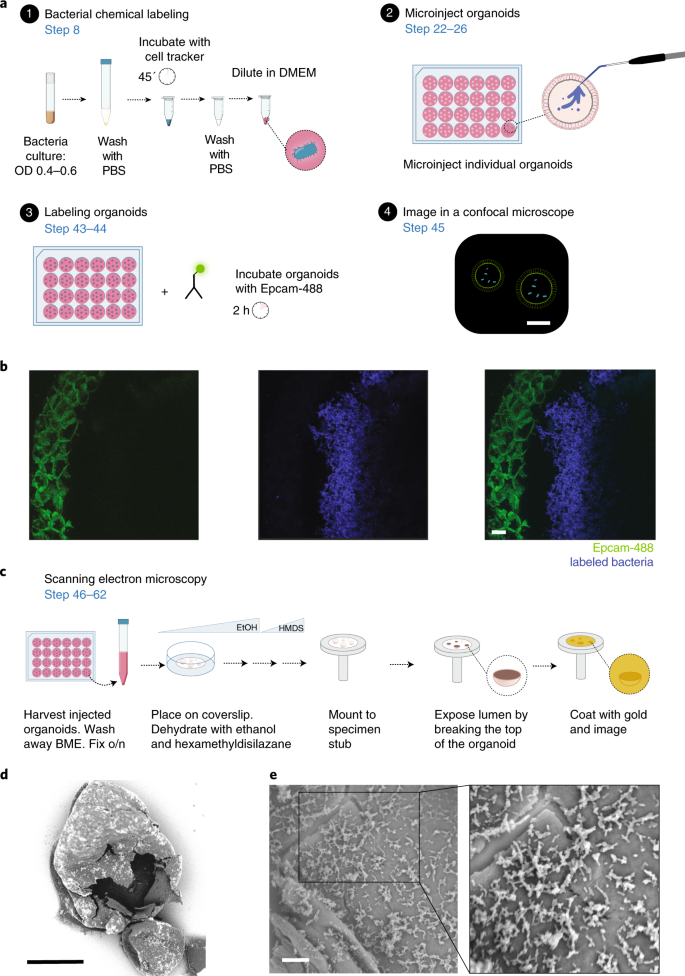
a, Fluorescent labeling of bacteria and organoids. b, Coculture of fluorescently labeled organoid (CD326 (EpCAM) Alexa Fluor 488, green, left panel) and bacteria (Fusobacterium nucleatum subsp. animalis strain B7_1 labeled with Cell Proliferation Dye eFluor 450, blue, middle) (merged on the right panel) after 24 h of coculture (scale bar, 150 µm). c, SEM for visualizing bacteria in the lumen of organoids. d, Organoid broken with a tungsten needle to expose bacteria on the inside (scale bar, 300 µm). e, Close-up images of bacteria on the apical surface of an organoid (scale bar, 10 µm).
-
-
9
Resuspend the pellet in a volume (V) of DMEM (typically 0.250 mL, see ‘Experimental design’) to achieve an optimal concentration for injections (see Steps 10–21).

Establish MOI
Timing 3 h hands-on time, 2 d in total
Critical
To calculate the MOI, both bacterial and organoid cell numbers need to be estimated. Owing to the heterogeneity of organoids, a target MOI is calculated assuming an average-sized organoid, and the exact MOI for any individual organoid will vary slightly from this value.
Establishing the cells per organoid conversion factor
-
10
Count the organoids in one representative dome of BME under a brightfield microscope.
-
11
Harvest this dome with a P1000 pipette, and dissociate the organoids to single cells as described in ref. 16 (basic protocol 5).
-
12
Count the single cells derived from the dome using a standard hemocytometer.
-
13
Calculate the cells per organoid conversion factor (Co) by dividing the number of cells (Step 12) by the number of organoids (Step 10) in the dome.
The value of Co is typically ~1,000 cells/organoid for organoids in optimal injection state.
Establishing the bacterial cell number
For some bacterial species, the optical density at a wavelength of 600 nm (OD600) to bacterial number conversion factor is well established (e.g., for Escherichia coli36) and can be used as ODc. Nevertheless, due to instrument and strain variations, it is recommended to generate a bacterial OD600 to cell number conversion factor as described below and use the conversion factor only in the linear OD600 to bacterial number conversion range.
To establish the bacterial cell number per optical density (ODc), a liquid culture of bacteria is grown and its OD600 is measured (ODl). After dilution and plating, the colony count Cb is used to calculate the conversion factor.
-
14
Grow bacteria to OD600 values of 0.1–1.0, plate in dilutions and count colonies after 1–2 d of growth to establish a conversion factor between OD and bacterial number:
$$OD_c = \frac{{C_b}}{{OD_l \ast D \ast V_p}}$$ODc = OD600 to bacterial count conversion factor
Cb = observed colony count
ODl = OD600 of original liquid culture
D = dilution factor from original culture (e.g., 0.1 for a tenfold dilution)
Vp = plated volume
-
15
After establishing the conversion factor ODc, the bacterial count in any liquid culture harvested at density of ODm can be calculated to determine the required dilution for injection into organoids. Multiply the harvested volume and measure ODm with the conversion factor ODc to yield the total number of harvested bacteria (B):
$$B = OD_c \ast OD_m \ast V_h$$where B is bacterial number, ODc is OD to bacterial count conversion factor, ODm is measured OD value and Vh is harvested volume.
Establishing the injected volume
-
16
To establish the volume per injection, transfer 1 µL of 0.05% (wt/vol) Fast Green Dye in DMEM to a microinjection needle using a microloader tip, and insert it in the microinjector (Fig. 2c).
-
17
Cut open the needle at a ~60° angle to ensure later optimal organoid penetration and bacteria release later in the procedure (Fig. 2d).
-
18
Repeatedly inject into a Petri dish filled with PBS until the volume is completely ejected.
-
19
By dividing the ejected volume by the number of shots needed to empty the needle, derive the injected volume per shot (Vs). In our experience, a Vs value of 2–20 nL is ideal for injecting organoids of various sizes. Adjust pressure or needle cutting if Vs deviates from this target range.
-
20
Calculate the planned injection volume (Vo) for an average organoid that received five injection shots as Vs × 5.
Diluting bacteria for injection at desired MOI
-
21
Resuspend a pellet containing a number of bacteria (B) in the volume V of DMEM with 0.05% (wt/vol) Fast Green Dye to visualize injections. To reach the appropriate target MOI (MOIt) for coculture, V is calculated as:
$$V = \frac{{B \ast V_o}}{{MOI_t \ast C_o}}$$where V is volume for resuspending the bacterial pellet, B is number of bacteria in pellet, Vo is volume injected into an average organoid, MOIt = target MOI and Co is conversion factor of cells per average organoid.
Microinjection
Timing hands-on and total time depend on number of organoids to be injected; ~5 min per dome
-
22
Take up 10 μL of the bacteria injection mix with a microloader tip, transfer it to the microinjection needle and insert it in the microinjector.
-
23
Cut the needle open at a ~60° angle to ensure optimal organoid penetration and bacteria release (see Step 17 and Fig. 2d,e).
-
24
Place the plate with organoids under a stereomicroscope in a flow cabinet.
-
25
Penetrate individual organoids with the needle, and inject a defined amount of bacteria–dye mix into the lumen (Fig. 2f). Surplus wells should be injected and discarded in the case of excessive leakage outside the organoids.
-
26
Track the fraction of injected organoids by brightfield microscopy of the injection dye (Fig. 2g) and bacteria at higher magnification immediately after injection and over the next days. The injection dye is normally lost within a few days owing to diffusion, but bacteria will remain visible as opaque clouds in the organoid lumen (Fig. 2h).
(Optional) Characterizing the coculture
(Optional) Assessment of bacterial viability
Timing 30 min hands-on time, 1–2 d in total
Critical
Growth media, oxygen levels, spatial restriction within organoids and cellular interactions may influence bacterial growth in the coculture. To gain an understanding of the coculture dynamics, the number of viable bacteria should be checked regularly.
-
27
Harvest a defined number of organoids from the culture (e.g., one representative dome) in 1 mL of cold DMEM, and transfer to an Eppendorf tube.
-
28
Spin for 5 min at 3,000g, and discard the supernatant. In the case of anaerobic bacteria, transfer to an anoxic environment at this step and make sure all reagents are anoxic from here onwards.
-
29
Incubate with 200 µL 0.5% saponin for 10 min to lyse the organoid cells and free luminal and intracellular bacteria.
-
30
Top up to 1 mL with PBS, spin for 5 min at 3,000g and discard the supernatant.
-
31
Resuspend in PBS, and make serial dilutions.
-
32
Plate a defined volume of liquid of each dilution step on the appropriate agar plates.
-
33
Incubate at 37 °C overnight, and count colonies within the next 3 days, depending on the growth speed of the colonies. The number of live bacteria per organoid can be calculated and compared with the initially injected number of bacteria (Steps 14–21).
(Optional) Assessment of bacterial identity
Timing 30 min hands-on time, 1 d in total
Critical
A universal 16S locus primer pair 357F/926R (375F 5′-CCTACGGGAGGCAGCAG-3′, 926R 5′-CCGTCAATTCMTTTRAGT-3′) can be used to amplify the 16S rRNA V3–V5 regions of bacteria37.
-
34
Pick a colony, wash in PBS and discard the supernatant. Resuspend in 10 μL PBS, and add 1 μL directly to the PCR mix (for a total volume of 30 μL). Use 4 μL 16S forward and reverse primers (both 5 μM).
Proceed to run a 16S PCR. Run the following program:
-
94 °C 10 min
-
[94 °C 1 min, 50 °C 30 s, 72 °C 30 s] × 30 cycles
-
72 °C 5 min
-
4 °C∞
-
-
35
(Optional) In the case of Gram-positive bacteria, enzymatic DNA isolation may be required prior to PCR amplification. If so, pick a colony, resuspend in the appropriate liquid medium and grow overnight. Harvest 1 mL of overnight culture, spin for 5 min at 13,000g and discard the supernatant. Isolate the DNA according to the manufacturer’s protocol, and run the 16S PCR.
-
36
Perform gel electrophoresis of the PCR product on a 1% agarose gel with ethidium bromide, excise the band corresponding to the 16S amplicon (569 bp if using the universal 16S primers indicated above) and isolate the DNA. In the case of a clean PCR product (single, well-defined band), the PCR product can be purified instead.
-
37
Sequence the DNA to assess the identity of the bacteria.
(Optional) Assessment of organoid viability
Timing 1.5 h hands-on time, 1–2 d in total
-
38
Harvest organoids from the culture in 1 mL of ice cold (4 °C) DMEM, and transfer to a 15 mL Falcon tube. Top up to 10 mL with DMEM (4°C).
-
39
Spin for 5 min at 300g, and discard supernatant.
-
40
Dissociate the organoids to single cells as described previously16 (basic protocol 5).
-
41
Resuspend cells in DMEM with 2 µg/mL DAPI, and pass through the cap of a cell strainer FACS tube.
-
42
Run on an analytical flow sorter, and assess ratio of DAPI negative to total cells to establish viability as described previously10,16 (basic protocol 5).
(Optional) Staining for live microscopy
Timing 15 min hands-on time, ~2 h in total
Critical
The interactions in organoid–bacteria cocultures can be characterized by live microscopy (Fig. 3a). Ideally, distinct fluorescent dyes should be used to mark epithelial and bacterial cells. For visualizing bacteria with fluorescent dyes before injection, refer to Step 8.
-
43
Add a fluorescently conjugated cell surface marker antibody (e.g., EpCAM Alexa Fluor 488 antibody) to the medium of a well with organoids in BME domes. For live staining in BME domes, high (1 µg/mL) concentrations of antibodies may need to be used.
-
44
Incubate for 2 h to allow the antibody to penetrate the BME and mark epithelial cell surfaces.
-
45
Image cocultures by fluorescence live microscopy (example shown in Fig. 3b).
(Optional) Scanning electron microscopy
Timing 2 h hands-on time, 2 d in total
Critical
SEM allows detailed insights into the bacterial organization at the cell surface (Fig. 3c).
-
46
Cut the front end of a P1000 tip to avoid mechanical shearing of organoids.
-
47
Harvest organoids from the culture in 1 mL of cold Cell Recovery solution, and transfer to a 15 mL Falcon tube.
-
48
Incubate for 2 h at 4 °C under regular rocking to facilitate digestion of BME.
Critical step
Improper digestion of BME will result in substantial background in the SEM imaging.
-
49
Top up to 10 mL with cold DMEM.
-
50
Spin for 5 min at 300g, and discard the supernatant.
Caution
From this step onward, protocol steps should be performed in a chemical safety cabinet owing to volatile toxic reagents.
-
51
Fix in 1% glutaraldehyde in PBS at 4 °C overnight.
-
52
Spin for 5 min at 300g, and resuspend in PBS.
-
53
Using a cut-off P1000 tip, transfer the organoids to the top of a coverslip coated with poly-l-lysine, and allow them to sediment and adhere to the surface for 10 min.
-
54
Using a pipette tip, carefully remove the supernatant.
-
55
Place each coverslip in a well of a 12-well plate, the organoid-coated side facing upward.
-
56
To initiate serial dehydration of the samples, add 1 mL of 10% ethanol in PBS to each well. After 10 min, remove the supernatant.
-
57
Using a pipette tip, carefully remove the supernatant and wash consecutively with 25%, 50% ethanol in PBS, 75%, 90% and 100% (twice) ethanol in water, followed by 50% and 100% hexamethyldisilazane in ethanol.
-
58
Dry coverslips in a chemical safety cabinet overnight.
-
59
Mount coverslips on specimen stubs, and place them under an overhead microscope for further manipulation.
-
60
To expose the interior of organoids injected with bacteria, use 0.5 mm tungsten needles to break the upper organoid wall under an overhead microscope (an example of a broken organoid is shown in Fig. 3d).
-
61
Coat the specimen surface with a 1 mm layer of gold using a Q150R sputter coater at 20 mA.
-
62
Proceed to SEM imaging of the samples (example shown in Fig. 3e).
(Optional) Assessment of transcriptional changes
Timing 2 h hands-on time, 5 h in total
Organoids offer the ability to profile host and microbial gene expression changes with high experimental control and clear attribution to cell types. Here we describe the considerations on how to harvest and process human and bacterial RNA.
-
63
Isolate RNA using a commercial kit such as Qiagen RNeasy Mini Kit or RNeasy Protect Bacteria Mini Kit. Organoid–bacteria cocultures can be harvested by directly lysing the domes with Trizol or RLT lysis buffers.
-
64
Treat samples with RNAse-free DNAse to remove any residual DNA contamination.
Critical step
If bacterial RNA is isolated, proper lysis of bacterial cell walls is critical for good isolation yield. Importantly, Gram+ bacteria require a more extensive lysis than Gram− microbes. Extensive DNAse treatment to remove any genomic DNA content is particularly important for bacterial samples owing to their lack of intronic material, which hampers distinguishing between genomic and transcriptomic amplification.
(Optional) Assessment of mutational effects
Timing ~3 d hands-on time, ~40 d in total
Critical
Detecting mutational effects of bacteria in organoids requires starting with a clonal organoid line, followed by a second clonal expansion step after exposure. Comparing the genomes of both clonal lines before and after the exposure allows the analysis of mutations occurring in individual cells during the coculture.
-
65
Inject organoids with bacteria as described in Steps 22–26..
-
66
Assess organoid cell viability (Steps 38–42) after 1–7 d of coculture at different starting MOIs, which helps to establish a coculture MOI and timeframe suitable for detecting a mutagenic effect. A slight viability decrease (>10% and <50%) is a good indicator for acceptable genotoxicity for a long-term coculture.
-
67
Using the parameters established in Step 67, inject organoids as described in Steps 22–26.
-
68
After a suitable coculture duration (typically 3 d), kill bacteria by adding 100 mg/mL primocin.
-
69
Let organoids recover from the exposure for 4 d.
Critical step
Premature passage of organoids after coculture can result in drastically reduced organoid viability.
-
70
Passage organoids, and allow them to grow to injectable size again.
-
71
Repeat Steps 68–71 at least two further times to allow mutations to accumulate.
-
72
Trypsinize organoids to single cells as described before16 (basic protocol 5).
-
73
Seed at a density of 100 cells/µL, and grow in expansion medium containing 10 µm RhoKi.
-
74
Once organoids reach a diameter of >50 µm, pick individual organoids and grow them into new organoid lines.
-
75
As soon as the lines are expanded successfully, harvest one well of a 12-well plate full of organoids and proceed to DNA isolation using commercially available kits.
-
76
Analyze the DNA of clonal organoids before and after exposure to bacteria using whole-genome sequencing as described previously38 (section ‘Whole-genome sequencing and read alignment’ and following).
Viral coculture of sheared organoids
Timing 1 h hands-on time, 3.5 h in total
-
77
Start with organoids as prepared in Steps 1–3. Harvest organoids in cold DMEM, and spin for 5 min at 300g and discard supernatant.
Critical step
Alternative routes of exposure, such as injection and virus addition to the media, can be used for specifically apical or basal access. The mechanical shearing protocol described here ensures both apical and basal access of the virus and yields the best infection efficiency in our experience.
-
78
Break cystic organoids with a narrowed glass pipette in 1 mL of DMEM. When differentiated organoids are infected, a brief 1–2 min incubation with TrypLE at 37 °C can be performed to aid in breaking the epithelial layer.
-
79
Spin for 5 min at 300g, and discard supernatant.
-
80
Wash organoids once with cold DMEM.
-
81
Thaw virus stock and dilute to appropriate MOI (see Steps 10–21) for MOI calculation). For virus infections of sheared organoids, the total cell number per dome is used (see Steps 11 and 12) for calculating the MOI instead of the number of injected organoids.
-
82
Resuspend organoid fragments in virus diluted in expansion or differentiation medium, depending on the cell types required (use 100 µL of diluted virus per well of a 12-well plate of harvested organoids).
-
83
Incubate for 2 h at 37 °C 5% CO2.
-
84
Wash twice with cold DMEM to remove unbound virus.
-
85
Resuspend thoroughly in BME by pipetting, and plate in domes of ~15 µL.
Optional step For extended exposure to the virus, it can also be added to the BME during Step 86 before plating.
-
86
Leave to solidify bottom-up in a 37 °C CO2 incubator for 10–20 min.
-
87
Add organoid expansion or differentiation medium on top (1 mL per well of a 12-well plate), and place in an incubator for the desired coculture duration.
Troubleshooting
Troubleshooting advice can be found in Table 1.
Timing
From thawing an established organoid line, it takes ~2 weeks before organoids are in the right growth state, size and density for injections. When a new organoid line is established17 for injections, it takes ~4 weeks before the right organoid number, growth state, size and density is reached.
Preparation of bacteria takes 6–48 h, depending on the species and strain used. The duration of the coculture and assays is dependent on the research question asked and can range from a few hours for imaging and transcriptional response studies to months for studies on mutations induced by bacteria. The expected duration of each procedure is indicated in the protocol and in the list below:
-
Organoid preparation for microinjection (Steps 1–3): 3 weeks (5 h hands-on) when starting from cryostocks; 5–10 d (3 h hands-on) when starting from a growing organoid culture
-
Bacterial preparation: 1–2 d (1.5 h hands-on) depending on strain used
-
Establishing MOI: 1.5 h (1 h hands-on)
-
Microinjection: 5 min hands-on time per dome
-
Characterizing the coculture:
-
Bacterial viability: 1–2 d in total (30 min hands-on)
-
Bacterial identity: 1 d (30 min hands-on)
-
Organoid viability: 1–2 d (1.5 h hands-on)
-
Live microscopy: 2 h (15 min hands-on)
-
SEM: 2 d (2 h hands-on)
-
Transcriptional effects: 5 h (2 h hands-on)
-
Mutational effects: 40 d (3 d hands-on)
-
Anticipated results
We anticipate that this protocol will be used to perform diverse experiments to study the direct effects of the microbiota in the intestinal epithelium for cancer, infection and homeostasis studies. In particular, it provides a guide to culture intestinal organoids, cocultures with single bacteria species or viruses and their downstream analysis by confocal or electron microscopy, qPCR or RNA and whole-genome sequencing.
By loading the bacteria/dye suspension mix into a microinjection needle (Fig. 2a–e), microbes can be delivered into the lumen of the organoids (Fig. 2f). If the microinjection has been successful, the dye should remain visible inside the lumen of the organoid and not spread outside its boundaries (Fig. 2f,g). When the bacteria are injected in high numbers or actively divide during the coculture period, they can be visible by light microscopy as a dark area inside the organoid lumen (Fig. 2h). Seeding sparse organoids that become big cysts with culture time will increase the injection success rate (Fig. 2f) In contrast, too dense, small or differentiated organoids will make it practically impossible to inject the entirety of the organoids from one culture (Fig. 2i–k). If bacteria overgrow outside the lumen, organoids generally show increased levels of cell death, which hampers the interpretability of coculture experiments (Fig. 2l).
In the case of suitable coculture conditions, viable bacteria can be retrieved from organoids to perform colony formation assays to quantify their viability and proliferation rate. Visible bacterial colonies should form within 2 d after plating on agar plates. 16S sequencing of colonies after coculture can also be used to rule out contaminations during the exposure period.
Organoid cell viability can be validated by DAPI exclusion flow cytometry analysis. Excessive exposure of organoids to bacteria or rapid degradation of medium components (e.g., during uncontrolled overgrowth of bacteria) decreases the proportion of viable epithelial cells. However, even under monoculture conditions, a fraction of 5–40% of organoid cells is expected to be stained by DAPI owing to cell turnover and stress during the digestion to single cells.
Cocultures of organoids and microbes stained with the chemical dyes described in this manuscript typically retain the signal for several days in the case of slowly dividing bacteria. Standard fluorescent microscopes can be used to follow the coculture regularly, while confocal microscopy is needed to reveal details of microbial positioning as shown in Fig. 3b. The formation of bacterial structures inside of organoids can be closely visualized by SEM within hours after injection (Fig. 3e), and variations in the bacterial number can be used to reveal different aspects of bacterium–host interactions.
The timing of genomic and transcriptional changes depends heavily on the interaction mechanism between microorganism and epithelial cells. In our experience, at least 9–15 d of exposure over a time frame of several weeks and followed by a clonal expansion step allows the detection of mutagenic processes. Transcriptional changes in both microbe and host cells can be detected faithfully by qPCR and RNA sequencing. Monitoring the fraction of injected organoids and location of bacteria is key to proper interpretation of the obtained expression changes.
In the case of viral infection of intestinal organoids, it is important to take into consideration the cell type tropism of the viral infection and the expression of the entry receptor by the epithelial cells. In the case of successful infection, the viral titer should increase after 1 d of infection.
Reporting Summary
Further information on research design is available in the Nature Research Reporting Summary linked to this article.
Data availability
All previously unpublished data are included in the figures. Raw image files are available from the corresponding author upon request.
References
Sato, T. et al. Single Lgr5 stem cells build crypt-villus structures in vitro without a mesenchymal niche. Nature 459, 262–265 (2009).
Dutta, D., Heo, I. & Clevers, H. Disease modeling in stem cell-derived 3D organoid systems. Trends Mol. Med. 23, 393–410 (2017).
Min, S., Kim, S. & Cho, S.-W. Gastrointestinal tract modeling using organoids engineered with cellular and microbiota niches. Exp. Mol. Med. 52, 227–237 (2020).
Leslie, J. L. & Young, V. B. A whole new ball game: stem cell-derived epithelia in the study of host-microbe interactions. Anaerobe 37, 25–28 (2016).
Heo, I. et al. Modelling Cryptosporidium infection in human small intestinal and lung organoids. Nat. Microbiol. 3, 814–823 (2018).
Bartfeld, S. et al. In vitro expansion of human gastric epithelial stem cells and their responses to bacterial infection. Gastroenterology 148, 126–136.e6 (2015).
Ettayebi, K. et al. Replication of human noroviruses in stem cell-derived human enteroids. Science 353, 1387–1393 (2016).
Lamers, M. M. et al. SARS-CoV-2 productively infects human gut enterocytes. Science https://doi.org/10.1126/science.abc1669 (2020).
Zhou, J. et al. Infection of bat and human intestinal organoids by SARS-CoV-2. Nat. Med. 26, 1077–1083 (2020).
Pleguezuelos-Manzano, C. et al. Mutational signature in colorectal cancer caused by genotoxic pks+ E. coli. Nature 580, 269–273 (2020).
Andersson-Rolf, A., Fink, J., Mustata, R. C. & Koo, B.-K. A video protocol of retroviral infection in primary intestinal organoid culture. J. Vis. Exp. https://doi.org/10.3791/51765 (2014).
Holthaus, D., Delgado-Betancourt, E., Aebischer, T., Seeber, F. & Klotz, C. Harmonization of protocols for multi-species organoid platforms to study the intestinal biology of Toxoplasma gondii and other protozoan infections. Front. Cell. Infect. Microbiol. 10, 610368 (2021).
Dutta, D., Heo, I. & O’Connor, R. Studying Cryptosporidium infection in 3D tissue-derived human organoid culture systems by microinjection. J. Vis. Exp. https://doi.org/10.3791/59610 (2019).
Sato, T. et al. Long-term expansion of epithelial organoids from human colon, adenoma, adenocarcinoma, and Barrett’s epithelium. Gastroenterology 141, 1762–1772 (2011).
Fakhiri, J. et al. Novel chimeric gene therapy vectors based on adeno-associated virus and four different mammalian bocaviruses. Mol. Ther. Methods Clin. Dev. 12, 202–222 (2019).
Pleguezuelos‐Manzano, C. et al. Establishment and culture of human intestinal organoids derived from adult stem cells. Curr. Protoc. Immunol. 130, (2020).
Beumer, J. et al. High-resolution mRNA and secretome atlas of human enteroendocrine cells. Cell 181, 1291–1306.e19 (2020).
Boonekamp, K. E., Dayton, T. L. & Clevers, H. Intestinal organoids as tools for enriching and studying specific and rare cell types: advances and future directions. J. Mol. Cell Biol. https://doi.org/10.1093/jmcb/mjaa034 (2020).
Bar-Ephraim, Y. E., Kretzschmar, K. & Clevers, H. Organoids in immunological research. Nat. Rev. Immunol. 20, 279–293 (2020).
Dijkstra, K. K. et al. Generation of tumor-reactive T cells by co-culture of peripheral blood lymphocytes and tumor organoids. Cell 174, 1586–1598.e12 (2018).
Greicius, G. et al. PDGFRα+ pericryptal stromal cells are the critical source of Wnts and RSPO3 for murine intestinal stem cells in vivo. Proc. Natl Acad. Sci. USA 115, E3173–E3181 (2018).
Noel, G. et al. A primary human macrophage-enteroid co-culture model to investigate mucosal gut physiology and host-pathogen interactions. Sci. Rep. 7, 45270 (2017).
Round, J. L. & Mazmanian, S. K. The gut microbiome shapes intestinal immune responses during health and disease. Nat. Rev. Immunol. 9, 313–323 (2009).
Spence, J. R. et al. Directed differentiation of human pluripotent stem cells into intestinal tissue in vitro. Nature 470, 105–109 (2011).
McCauley, H. A. & Wells, J. M. Pluripotent stem cell-derived organoids: using principles of developmental biology to grow human tissues in a dish. Development 144, 958–962 (2017).
Forbester, J. L. et al. Interaction of Salmonella enterica serovar Typhimurium with intestinal organoids derived from human induced pluripotent stem cells. Infect. Immun. 83, 2926–2934 (2015).
Holokai, L. et al. Increased programmed death ligand-1 is an early epithelial cell response to Helicobacter pylori infection. PLoS Pathog. 15, e1007468 (2019).
Finkbeiner, S. R. et al. Stem cell–derived human intestinal organoids as an infection model for rotaviruses. mBio 3, e00159-12 (2012).
Nikolaev, M. et al. Homeostatic mini-intestines through scaffold-guided organoid morphogenesis. Nature 585, 574–578 (2020).
Jalili-Firoozinezhad, S. et al. A complex human gut microbiome cultured in an anaerobic intestine-on-a-chip. Nat. Biomed. Eng. 3, 520–531 (2019).
Steinway, S. N., Saleh, J., Koo, B.-K., Delacour, D. & Kim, D.-H. Human microphysiological models of intestinal tissue and gut microbiome. Front. Bioeng. Biotechnol. 8, 725 (2020).
Hinman, S. S., Wang, Y. & Allbritton, N. L. Photopatterned membranes and chemical gradients enable scalable phenotypic organization of primary human colon epithelial models. Anal. Chem. 91, 15240–15247 (2019).
Avraham, R. et al. A highly multiplexed and sensitive RNA-seq protocol for simultaneous analysis of host and pathogen transcriptomes. Nat. Protoc. 11, 1477–1491 (2016).
Marsh, J. W., Humphrys, M. S. & Myers, G. S. A. A laboratory methodology for dual RNA-sequencing of bacteria and their host cells in vitro. Front. Microbiol. 8, 1830 (2017).
Westermann, A. J. et al. Dual RNA-seq unveils noncoding RNA functions in host–pathogen interactions. Nature 529, 496–501 (2016).
Sezonov, G., Joseleau-Petit, D. & D’Ari, R. Escherichia coli physiology in Luria–Bertani broth. J. Bacteriol. 189, 8746–8749 (2007).
Sim, K. et al. Improved detection of bifidobacteria with optimised 16S rRNA-gene based pyrosequencing. PLoS ONE 7, e32543 (2012).
Blokzijl, F. et al. Tissue-specific mutation accumulation in human adult stem cells during life. Nature 538, 260–264 (2016).
Acknowledgements
We thank E. Allen-Vercoe and A. Robinson for provision of bacterial strains and discussions on bacterial culturing conditions. The development of the methods was supported by CRUK grant OPTIMISTICC (C10674/A27140) (J.P., C.P.-M. and H.C.), the Gravitation projects CancerGenomiCs.nl, and the Netherlands Organ-on-Chip Initiative (024.003.001) from the Netherlands Organisation for Scientific Research (NWO) funded by the Ministry of Education, Culture and Science of the government of the Netherlands (J.P., C.P.-M. and H.C.), the Oncode Institute (partly financed by the Dutch Cancer Society), the European Research Council under ERC Advanced Grant Agreement no. 67013 (J.P., D.D., I.H. and H.C.) and NETRF/Petersen Accelerator (J.B.).
Author information
Authors and Affiliations
Contributions
All authors contributed to the development of the organoid co-culture methods described in this protocol. J.P., C.P.M. and H.C. wrote the manuscript with input and corrections from all authors. A.M.S., C.P.M. and J.P. prepared figures.
Corresponding author
Ethics declarations
Competing interests
H.C. is inventor on multiple patents held by the Dutch Royal Netherlands Academy of Arts and Sciences that cover organoid technology: PCT/NL2008/050543, WO2009/022907; PCT/NL2010/000017, WO2010/090513; PCT/IB2011/002167, WO2012/014076; PCT/IB2012/052950, WO2012/168930; PCT/EP2015/060815, WO2015/173425; PCT/EP2015/077990, WO2016/083613; PCT/EP2015/077988, WO2016/083612; PCT/EP2017/054797,WO2017/149025; PCT/EP2017/065101, WO2017/220586; PCT/EP2018/086716; and GB1819224.5. H.C.’s full disclosure is given at https://www.uu.nl/staff/JCClevers/.
Additional information
Peer review information Nature Protocols thanks the anonymous reviewers for their contribution to the peer review of this work.
Publisher’s note Springer Nature remains neutral with regard to jurisdictional claims in published maps and institutional affiliations.
Related links
Key references using this protocol
Pleguezuelos-Manzano, C. et al. Nature 580, 269–273 (2020): https://doi.org/10.1038/s41586-020-2080-8
Heo, I. et al. Nat. Microbiol. 3, 814–823 (2018): https://doi.org/10.1038/s41564-018-0177-8
Lamers, M. M. et al. Science 369, 50–54 (2020): https://doi.org/10.1126/science.abc1669
Supplementary information
Rights and permissions
About this article

Cite this article
Puschhof, J., Pleguezuelos-Manzano, C., Martinez-Silgado, A. et al. Intestinal organoid cocultures with microbes. Nat Protoc 16, 4633–4649 (2021). https://doi.org/10.1038/s41596-021-00589-z
Received:
Accepted:
Published:
Issue Date:
DOI: https://doi.org/10.1038/s41596-021-00589-z
This article is cited by
-
Constituents of stable commensal microbiota imply diverse colonic epithelial cell reactivity in patients with ulcerative colitis
Gut Pathogens (2024)
-
Use of mouse primary epidermal organoids for USA300 infection modeling and drug screening
Cell Death & Disease (2023)
-
Bioengineering translational models of lymphoid tissues
Nature Reviews Bioengineering (2023)
-
Intracellular bacteria in cancer—prospects and debates
npj Biofilms and Microbiomes (2023)
-
Advanced Organotypic In Vitro Model Systems for Host–Microbial Coculture
BioChip Journal (2023)
Comments
By submitting a comment you agree to abide by our Terms and Community Guidelines. If you find something abusive or that does not comply with our terms or guidelines please flag it as inappropriate.
